Posts

Showing posts from February, 2024

HAPPINESS COMES IN VERY SMALL PACKAGES - MFT FEBRUARY RELEASE SPOTLIGHT
Image
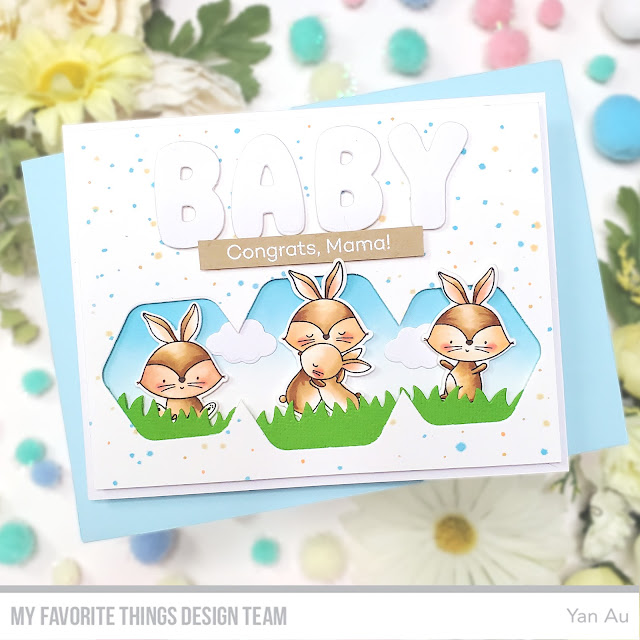
  Hello, dear friends! Welcome back to my blog as we wrap up the final day of the MFT February New Release. I am excited to shine the spotlight on the February New Release with you! Today, I have the pleasure of showcasing a clean and simple card featuring the adorable Happiness Comes In Very Small Packages Stamp Set . To create this card, I started by stamping the adorable images onto Smooth White Card Stock using the Memento Tuxedo Black Ink. With careful precision, I colored them using Copic Markers. Afterward, I die-cut them out using the coordinating die-namics. And then, I die-cut the grass using the Grassy Edges Die-namics onto a piece of green card stock. Next, I die-cut the word "BABY" from the stamp set on another piece of white card stock. Additionally, I trimmed another piece of white card stock and used the Stitched Rounded Hexagon STAX Die-namics to create three hexagon shapes. By adding a touch of color, I achieved a mesmerizing meteor effect. Finally, I heat

GREATEST PRESENT - MFT FEBRUARY RELEASE DAY

Image
  Hello Everyone!! Prepare yourselves for an extraordinary shopping experience! The MFT February Release products have just become available for purchase. Today, our exceptionally talented DT members showcase their inspiring projects using these exciting new products. In this blog post, I am thrilled to share a delightful card featuring the adorable SY Greatest Present Stamp Set by Stacey Yacula. It perfectly captures the essence of this NEW Release ! To create this card, I started by stamping the adorable critters onto Smooth White Card Stock using the Doe Premium Dye Ink. I then colored them with Copic Markers and used the coordinating die-namics to cut them out. Next, I die-cut the Stitched Oblong STAX Die-namics to create an oblong shape on another white card stock. I stamped the sentiment included in the stamp set on this piece. Finally, I trimmed the pattern paper from the Orange Sherbet Paper Pad for my card base and adhered to the colored images using foam tape. Thank you fo

YUZU YOU MAKE MOO SO HAPPY - MFT FEBRUARY RELEASE COUNTDOWN DAY 1

Image
  Hello Craft Friends!! Welcome to the exciting conclusion of the MFT February Release Countdown. The incredible new products we've showcased over the past few days will be available for purchase tomorrow at 10:00 am EST! Are you ready for Moo Time? Today, I have a delightful card featuring the YUZU You Make Moo So Happy Stamp Set from YUZU's line to share with you. To create this card, I began by stamping the adorable images onto Smooth White Card Stock using Memento Tuxedo Black Ink. Then, I expertly colored them using Copic Markers. Afterward, I used the coordinating die-namics to cut them out. Next, I trimmed another piece of White Card Stock and blended Distress Oxide in Tumbled Glass and Shaded Lilac, resulting in a captivating background. Once it dried, I added a white postal color and water, creating an intriguing effect. Finally, as shown, I stamped the sentiment included in the stamp set and carefully affixed all the images using foam tape. I hope my card creation br

HEADED FOR THE STARS - MFT FEBRUARY RELEASE COUNTDOWN DAY 2

Image
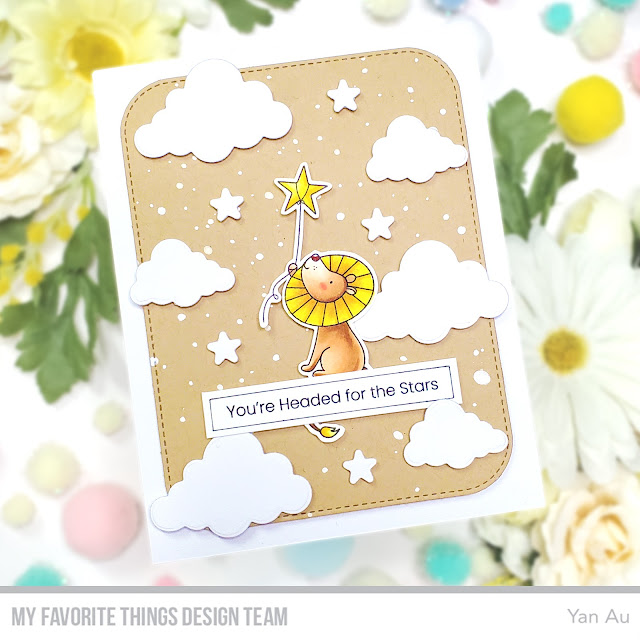
   Hello Friends!! I am thrilled to have you here on Day 2 of the MFT February Release Countdown. Mark your calendars because the highly anticipated New Release will be available for purchase on Tuesday, February 27, at 10:00 am EST. Love continues filling the air today, and I couldn't be more excited to share a clean and simple (CAS) card featuring the charming Headed For The Stars Stamp Set . To create this card, I began by stamping the adorable images onto Smooth White Card Stock using the Memento Tuxedo Black Ink. After coloring them with Copic Markers, I used the coordinating die-namics to cut them out. Next, I added visual interest by die-cutting round corner panels with the Blueprints 31 Die-namics on a piece of kraft card stock, then splattering some white postal color for my card base. I also die-cut the clouds and stars using the same stamp set. Finally, I stamped the sentiment included in the stamp set and adhered all the pieces with foam tape onto the front of my card.

BIRTHDAY BITES - MFT FEBRUARY NEW RELEASE COUNTDOWN DAY 3

Image
   Hello Craft Friends!! Prepare to be delighted because we have an exciting surprise for you! Welcome to Day 3 of the MFT February Release Countdown! I couldn't be more thrilled to present a charming Birthday card featuring the adorable Birthday Bites stamp set from the trendy Jenoblade line. To create this card, I began by stamping the cute images onto Smooth White Card Stock using the Memento Tuxedo Black Ink. I colored them using Copic Markers. I then carefully cut them out using the coordinating die-namics. Moving on, I stamped the cakes onto another piece of white card stock using a no-line coloring ink pad. To create a clean outline, I freehandedly cut the cakes' shapes from a piece of Inkadinkado stamping mask paper and placed it over the stamped images. Next, I blended the Distress Oxide inks in Worn Lipstick and Shaded Lilac and splattered some water for interest. Once the ink was dry, I die-cut the sentiment "happy birthday" using the Essential Happy Birth

BIG SCREEN SCENES - MFT FEBRUARY RELEASE COUNTDOWN DAY 4

Image
  Hello  friends! The moment has arrived! We cannot contain our excitement as we officially announce the much-awaited MFT February Release! Join us as we embark on Day 4 of the MFT February Release Countdown, where love takes center stage in this month's captivating product lineup. Today, I am thrilled to showcase a delightful card featuring the enchanting Big Screen Scene Stamp Set from the trendy Jenoblade line. To begin, I carefully stamped the adorable image onto Smooth White Card Stock using the Memento tuxedo black ink and brought it to life with vibrant colors using Copic Markers. Next, I die-cut the TV using the Classic TV Die-namics , selecting the perfect MFT color card stock. Afterward, I expertly made a round corner panel using the Blueprints 31 Die-namics and blended the Distress Oxide in Salvaged Patina with the Snowfall Stencil . Once the ink had dried, I stamped the sentiment included in the stamp set onto the card front. Lastly, I trimmed a piece of patterned pap

BLUEPRINTS 31 - MFT FEBRUARY VAULT RELEASE DAY

Image
  Greetings, Crafty Friends! Welcome back to my blog as we embark on an exciting journey into the captivating realm of the MFT February Vault Release, which is now readily available for you to indulge in your crafting passion. Today, I am delighted to present a delightful card that beautifully showcases the exquisite Blueprints 31 Die-namics .  To begin, I die-cut the small rounded corner panels from a white cardstock using the Blueprints 31 Die-namics and then adorned them with a captivating pattern using the Never-Ending Love Background Stamp . Additionally, I meticulously die-cut the remaining pieces from the MFT color cardstock. Next, I stamped the endearing lion from the Lovely Lions Stamp Set and die-cut it using the coordinating die-namics and I colored with Copic markers. Finally, as shown, I stamped the included sentiment on the front and securely affixed all the images using foam tape. It is my sincerest hope that this card creation brings you immense joy! Remember to visit

STITCHED BASIC EDGES - MFT FEBRUARY VALUT RELEASE COUNTDOWN

Image
    Hello, friends! Welcome to the February Vault Release at MFT Countdown. This month, we're returning to the basics with a wide range of products. Whether you're looking for essentials to build your card designs or seeking inspiration for starting from scratch, we've got you covered. All these products will be available tomorrow at 10:00 am EST. Today, I'm excited to share a delightful card featuring two captivating die sets: the Stitched Basic Edges Die-namics and the Stitched Star STAX Die-namics .  First, I trimmed a white card stock and blended it with the Distress Oxide in Worn Lipstick, creating the card base. Then, I die-cut five stars onto another white card stock using the Stitched Star STAX Die-namics. Moving on, I used the Stitched Basic Edges Die-namics on a piece of kraft card stock and blended the pattern using the Herringbone Stencil. Next, I stamped the adorable mice from the Micest Friend Stamp Set and carefully cut out a few egg shapes with scissor